
For the annual MeG Skullrollers competition I chose to use my 7th Crusade army. The choice was made because despite painting it back in 2019, I hadn't used it in competition. I must confess I don't think it is that effective an army, but had painted it to have a "crusader" army that wasn't one of my usual choices.
Due to circumstances I acted as umpire on the first day of the competition, but did get to play the 2 games on the second day. To find out how St. Louis did, read on ...
The army list I used was:
It is basically a French army of the mid-C13th CE but with a higher than usual number of crossbowmen. Historically Louis recruited around 5000 crossbowmen for his army to invade Egypt. The high number was no doubt because Frankish armies in Outremer found the crossbow to be a very effective weapon against the cavalry based armies they faced.
The main strike force of the army is, of course, the knights, especially the Superior ones. I chose to take the Templar military order knights as Fanatics - meaning the unit has to be wholly destroyed rather than routing when it has lost more than 50% which is the usual case in MeG.
The army has an internal allied general as this is the only way to get 4 generals in the army. In my mind this meant that he would be Robert d'Artois, one of the king's brothers, who was killed at the Battle of Mansurah when disobeying the king's instructions.
The first game saw me facing a Frankish Greece army played by Dave Parish. We have played quite frequently over the last few years and the games are always great and we always seem to end up with at least one bizarre or humorous situation in each game. This game was no exception I am pleased to say 😁 Dave deservedly won the Best Sport prize at the end of the weekend.
Dave won the initial dice roll and chose to defend. Louis was off on holiday to Greece it would appear.
The battlefield ended up with a couple of steep hills and a forest on my right flank and a piece of rough ground more or less in the centre of the table. I was slightly outscouted by the Franks so had to go first in the deployment phase.
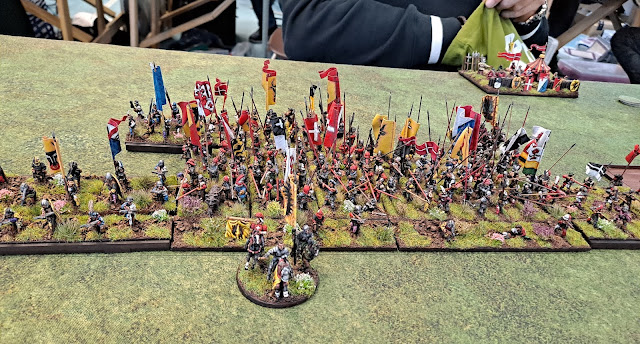
I decided to deploy my army over to the right of the battlefield. My knights were more or less alternated with infantry units and the whole army echeloned back. The Franks deployed with a wodge of knights facing my left with Almughavars on either side of them. Some more knights and lesser cavalry deployed on their right. It all looked like this:
The first couple of moves saw the 2 bodies of knights move towards each other. I pushed up a unit of crossbowmen along with my knights. This was a bit of a risk as they could get ridden down but I wanted their shooting to try and get an advantage in the combats and I could arrange my knights in such a way that they wouldn't be hit by too many knights.
On my right another crossbowman unit scaled the hill to draw off the Almughavars on that flank. My hope here was that by being uphill they would be able to slow up the Almughavars, but I expect them to lose in the long run as the Almughavars were Superior.
On my left the other Frankish cavalry rode round to threaten my flank whilst more Almughavars advanced into the rough. This flank was a bit stalemated given the troops in the area and so it was likely to be on my right where the important action would take place - at least to begin with.
As expected the knights clashed with my Fanatic Templars taking on 2 units of the enemy. Their main role would be to hold these units up with the extra resilience they had from being Fanatic. As I had planned the crossbowmen were only hit by a couple of knights and their shooting did a bit to help.
The initial clash between the knights on the right hand end of the line and their Frankish opponents went my way. Louis himself entered the fight to inspire his troops. After a couple of turns of fighting the Frankish knights facing him were on the verge of breaking and the Superior Almughavars were turned away from the crossbowmen as a result.
The Templars did what I wanted them to and were holding greater numbers at bay.
On my left flank the more or less stalemate continued. The dangerous Almughavars were pinned in the rough by the threat of a unit of Superior knights, and the combination of the other knights (albeit just Average), crossbowmen and spearmen meant that the Franks did not want to commit.
In the next move I got lucky, perversely by not breaking the knights who were on the verge of breaking - this was lucky because it meant that my crossbowmen could advance and force the Superior Almughavars to face them meaning they could not get into the flank of the knights led by Louis.
Thus when I did break those knights they could pursue in safety and then turn inwards to be in a position to charge the flank of the knights fighting my Templars.
By this time the Templars and crossbowmen had broken the smaller unit of knights they were fighting, although the crossbowmen were a single would off breaking themselves. The Templars had been reduced to a single base but were not broken as they were Fanatics - well worth the huge points cost in my view.
However, on my left the Franks had finally worked themselves into a position to charge my Average knights and were battering them. But as compensation on my right the crossbowmen on the hill were fighting like demons against the Superior Almughavars giving as good as they got despite their being at a disadvantage. Overall I was quite happy 😀
The knights led by Louis crashed into the rear on the already engaged Franks and despite some resistance broke them. Then, having no real targets available elsewhere they turned around and rode off towards the Frankish camp hoping for loot no doubt.
On the other hand my Average knights were soundly beaten, but due to the situation the victorious Franks then pulled back to set up a more coherent charge in a future move.
On the right my crossbowmen and the Almughavars mutually broke - a real result against the odds for my troops even though they were broken.
Louis now led the knights at speed into the Frankish camp and sacked it in short order. The following picture is just before that happened.
The Franks on my left did manage to charge and break my left most spearmen unit but with the camp gone their army broke.
All in all I felt that I had the rub of the green in this game and had beaten an army I should probably have lost to. Whilst I was pleased with how I neutralised a good part of the Frankish army, I think that I won most of the 50:50 situations where on another day the results could easily have been different.
The game score was 15-6.
In the second game St. Louis decided to invade Switzerland to face off against Paul Stovell's fearsome Later Swiss army.
Terrain ended up as mostly open but with 4 steep hills, mostly towards my right. I had hoped for it to be a bit more broken up than this, but it was not to be. Again I was outscouted.
I deployed most of my crossbowmen behind a hill on my right - at least they'd be safe on there, well away from the pikemen. The rest of the army deployed left of that feeling rather nervous. The Swiss deployed 3 keils of pikemen on their right, with halberdiers and skirmishers to their left. A loose "screen" of light artillery was behind the lines. To my surprise the Swiss camp was directly in front of my massed crossbowmen with only a skirmisher unit in front of them - looked like a target to me.
This was the situation after deployment.
I must confess I was not at all sure how I could win this one. Whilst the Swiss break on only 3 units lost, getting that with my army was going to be really tough.
I decided that one crossbowman unit was going to just pile forward towards the Swiss camp. I would then gang up the other 2 to have a god at the halberdiers on the Swiss left who I expected would go and occupy the hill in front of them - which they did. The knights on the left would have to try and distract the keils ...
Unsurprisingly the Swiss advanced forwards with menace. I quickly realised I had over committed my Average knights - the picture below shows this all too clearly ...
My knights did not even put up a token resistance when charged and disappeared a move later 😟
Things were a bit better elsewhere though, and by massing 2 units of crossbowmen against the Swiss halberdiers I was soon causing casualties. Louis led the other crossbowmen straight at the camp - maybe not the most heroic action by a C-in-C.
My knights, meanwhile, were trying to avoid pikemen. Despite being Fanatic the Templars withdrew at speed towards my base edge in an attempt to gain manoeuvre room.
Thankfully the Templars got away into open spaces as the keil chasing them was needed elsewhere.
The crossbowmen continued to cause casualties to the halberdiers on the hill which in turn caused a second keil to head towards my right. One unit of crossbowmen was in real trouble with these pikemen bearing down on their flank, but they did manage to adjust their formation so that they would be in terrain when hit which gave them a small chance - and meant part of the unit could keep shooting.
However, despite some heroic resistance they were overwhelmed by the keil and a small unit of halberdiers. They did, however, contribute to the destruction of the halberdiers who had been shot at for a number of moves. At the same time the crossbowmen led by Louis had reached the Swiss camp and sacked it in short order. Thus I had now got 2 of the 3 units of the Swiss I needed to break their army.
The key fight was now going to be between a keil and a unit of my Superior knights on my right. If the latter could hold on for a move the Templars would be able to get into position to charge the keil in the rear whilst it was fighting to its front; even a Swiss keil would find that tough to shake off.
As you can see from the picture below the knights did hold on 😎 Mind you, the other knight unit on my far left was going to be run over by the 3rd keil - I could do nothing about it.
The Templar charge was pretty devastating, but a Swiss keil is massive and tough. Whilst they and the other knights were slowly chewing their way through the keil my crossbowmen near the central hill were broken by a combination of halberdiers and pikemen. But my knights on the left were destroyed as expected.
It was all going down to the wire. I needed to break the badly damaged keil before my knights were taken out by onrushing Swiss infantry. Next loss decided the game.
Thankfully it proved to be the keil that broke first, and with that I'd won the game.
15-8 to me.
Really could have gone either way and was great fun. I suspect it was really decided by where the Swiss camp was placed. If I hadn't been able to take that out I am pretty sure the Swiss would have won.
All in all a successful day. I won both games after all 😁


Comments
Post a Comment