.jpg)
Over the weekend of the 19th and 20th July at Devizes School, UK, 16 MeG players took part in competition with a theme of "Constantine the Great to Yazdgird III, 306 CE to 651 CE" with a list of allowed armies based on this.
I took a C5th CE Foederate Roman army and to see how they fared in the first two games, read on ...
The list I took was:
This list is from the time of Aetius when he was relying heavily on Hunnic troops. All mounted it relies on manoeuvre and the shooting of the Huns, especially the 3 Skilled shooting units. The 3 allies is a risk, but a calculated one; plus it adds spice to the first card deal of the game 😁
All the lists used at the weekend can be found HERE.
The first round draw matched me up against Matt Haywood, so we yet again got to play - seems to be a feature of this year's competitions 😋 Matt was using a rather nice Middle Sasanid Persian with a Kushan ally a bit similar to the one he used at Thus Spake Zarathustra which I had faced in the last game of the competition.
I defended and aimed to get a reasonably open table but with a few patches of rough terrain to constrain Matt's catafracts. Alas, this plan rather failed and we ended up with mostly open (good) with mountains on my left as a secure flank (not so good), a mountain on my right (not good combined with the other flank) and pieces of rough on each of our base edges (OK, but would have been nice further out). Annoyingly I was outscouted (by 20% IIRC) which was a bit of a blow. I think whoever got to deploy troops second in this game had a material advantage - so that went to Matt.
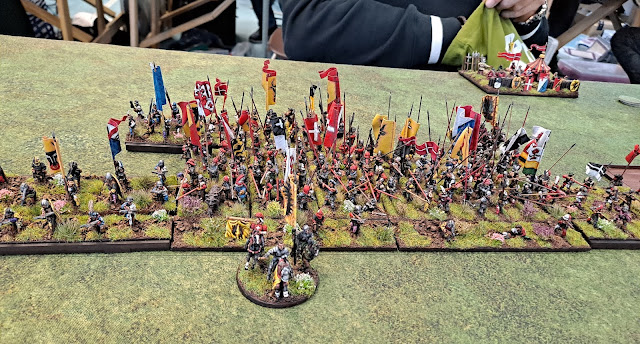
I deployed my smaller Hun ally on my right (on the mountain but they should be able to get off it promptly in the first move), my Roman ally on my left with the larger Hun ally and C-in-C's command a bit intermixed between them. Matt, as is his wont, deployed quite compactly with a mass of disposable skirmishers covering catafracts and elephants next to the secure flank with more catafracts and a unit of Persian armoured horse archers on his left. He also had a unit of archers on the mountain on his right. It looked like this:
All 3 of my allies were reliable for this game. Matta advanced solidly more or less across the line, although his right lagged a bit (due to cards). I pushed forward also across most of my line as I would need as many shooting chances as possible. On my right the Huns came off the mountain as planned so would be able to swing around Matt's left later.
As Matt continued his strong push his skirmishers on my left were withdrawn to give a clear path for his catafracts which did usefully mean I had some shooting options - but against troops with Armoured Horse this would be a long job even through I had some Skilled shooters. On my right a charge from the Kushan catafracts forced back some of my cavalry who cannot fight them in combat, but my Huns on the right start to envelope the Sasanid left - here my Superior Roman cavalry are in a good threatening position putting pressure on the Persian armoured horse archers and behind the flank of the Kushans.

The pressure I am putting on the left of the Sasanid army means that the Kushan catafracts have to turn to face my Roman cavalry who have charged the Persian cavalry. The Persian cavalry have to skirmish rather than run away but are not caught but are in a position where a Hunnic Skilled shooting unit (with Shoot & Charge) can get into position to charge their flank. However, along the rest of the line the Sasanids continue to exert a lot of pressure with catafracts and elephants forcing back my cavalry whose shooting is negligible.

We now get some fighting. My Huns charge the Persian cavalry and Matt feels they have to stand and take it otherwise I get a unit behind his lines. Of course, the Huns fluff their lines with the Skilled Shoot & Charge doing no damage, but do well in the combats but just fail to break the Persians in this move. Must confess I felt a little robbed by that, but that's the way things can go 😖 At the same time the Kushan catafracts charge ad drive back my Roman cavalry.
Matt's Kushan elephants also charge a unit of Foederate cavalry who fail to evade out of the way (5 of my first 6 evade dice rolls were 1 in this game ...) and are caught - ouch 😒 However, thanks to a Skull on a single green die and the cavalry's own shooting, plus some impressively lucky combat dice at the end of the turn both the cavalry and elephants are just 1 wound of breaking.
On my left the pressure is now severe, but one catafract unit is now down 2 bases.
The next move the cavalry and elephants mutually break - which is a good result for me all things considered - as do the Persian cavalry. However, this is also where the game ended. Once again Matt and I had managed to get into an overly thinking game and failed to get a result - a rut we need get out of. The result left us at the bottom of the table 😔 It was, however, an enjoyable game which is the important thing.
The afternoon game was against Adrian Pitfield with an Alan army comprising wholly of Charging Lancers - Superior and Average. Likely to be a game where either my shooting was good and blunted his army, or he would charge and sweep my army away.
I again defended and tried for mostly open with some patches of rough ground to break up the Alans. Mostly open was achieved with a mountain and forest on my left, but only 1 pieces of other terrain appeared which was some rough in my half of the table round about central. All down to the shooting then ...
I outscouted Adrian which was useful, but not a major thing, and he deployed a line of charging cavalry from the secure flank across the table; Superior cavalry in a single rank in front of Average cavalry. I decided I'd try and turn his line from my right so deployed in that half of the table with my best shooters and cavalry on my right. I placed 3 Hun units in the rough going - I expected they would eventually get destroyed but hoped they would hold up the Alans whilst I won on the right. It looked like this:
I forgot to take pictures during the first couple of turns, however, we can pick up the story without much problem after some initial fighting.
Adrian went route 1 and just moved his army as fast as possible towards mine - and why not 😁 This included aiming for the Huns I had in terrain. This would slow him and allow me more shooting, but was in his favour in the long run. As I had pushed some of my cavalry forward to slow the Alan advance one of the Superior units found itself a bit isolated and I got one of the Roman cavalry on its flank and 2 units of Hunnic Skilled shooters in range to its front. Rather annoyingly the shooting was sub-par and although it was battered to just 1 wound off breaking Adrian risked breaking it off from my cavalry which it did successfully (my KaB on it was a blank). The shooting from the Huns in the terrain was also, shall we say, disappointing 😒
There is another gap in the photographic record here 😖
Despite some more shooting at the really vulnerable Alan unit my dice remained uncooperative and it refused to die. Of course, the Roman cavalry who had been fighting them now ended up caught in an evade by another Alan unit and were despatched in short order after doing next to no damage back. Ho, hum 😕 This then brought my Superior Roman cavalry into the fight whilst I took a unit of Huns around the left flank of the Alans to see what trouble I could cause there. Meanwhile in the rough terrain my other Huns continued to shoot rubber arrows.
Over the next couple of moves I finally manged to break the tottering Alan unit and the Superior cavalry also broke the other Alan unit in the vicinity. Unfortunately in the rough terrain 2 of the 3 Huns had been destroyed and the 3rd was 1 wound from breaking, although so was 1 Alan unit. Whilst I did have a reasonable cavalry force on my right, the accumulated losses were leaving my army quite vulnerable 😓
The dénouement came quickly. The Huns on the left succumbed and failed to break the teetering Alans. On the right an Alan unit charged another Hunnic unit who, despite Skilled shooting, did nothing and, insult to injury, failed to evade far enough and were caught. That rather ended things as my army collapsed in defeat.
Despite the loss and frustrations along the way it was still a most enjoyable game which Adrian deservedly won through direct tactics which could exploit and faltering in my shooting. Another day it could easily have gone the other way.
So at the end of day 1 was was 1 place off the bottom, a position now held by Matt Haywood who had had a nightmare 2nd game scoring no points.
The day 2 games will follow soon, watch this space ...
.jpg)


This is an excellent breakdown of how to prepare for the PK0-005 exam. The tips here are straightforward and can save a lot of study time. I like that it emphasizes the importance of smart preparation rather than just long hours of study.
ReplyDeleteI’d also suggest exploring timed practice tests. They simulate real exam conditions and make you much more comfortable with managing the pressure during the certification exam. Microsoft Dynamics 365 Business Central Developer
mb-820 exam
mb-820 exam
pk0-005 practice exam
The Educator: He believes knowledge is power. Through Tiger Exchange AI, he demystifies crypto, offering AI tools that help users learn and grow their investments safely.
ReplyDeletetiger exchange vip