Almoravids vs. Cypriots - an African Odyssey

A couple of weeks ago Ray and I had a game to allow him to practice with his Almoravid army for the Post Covid Cup he was running. I delayed this write up until after the competition because of that. Read on for the game ...
The lists used were Almoravid (as mentioned) for Ray: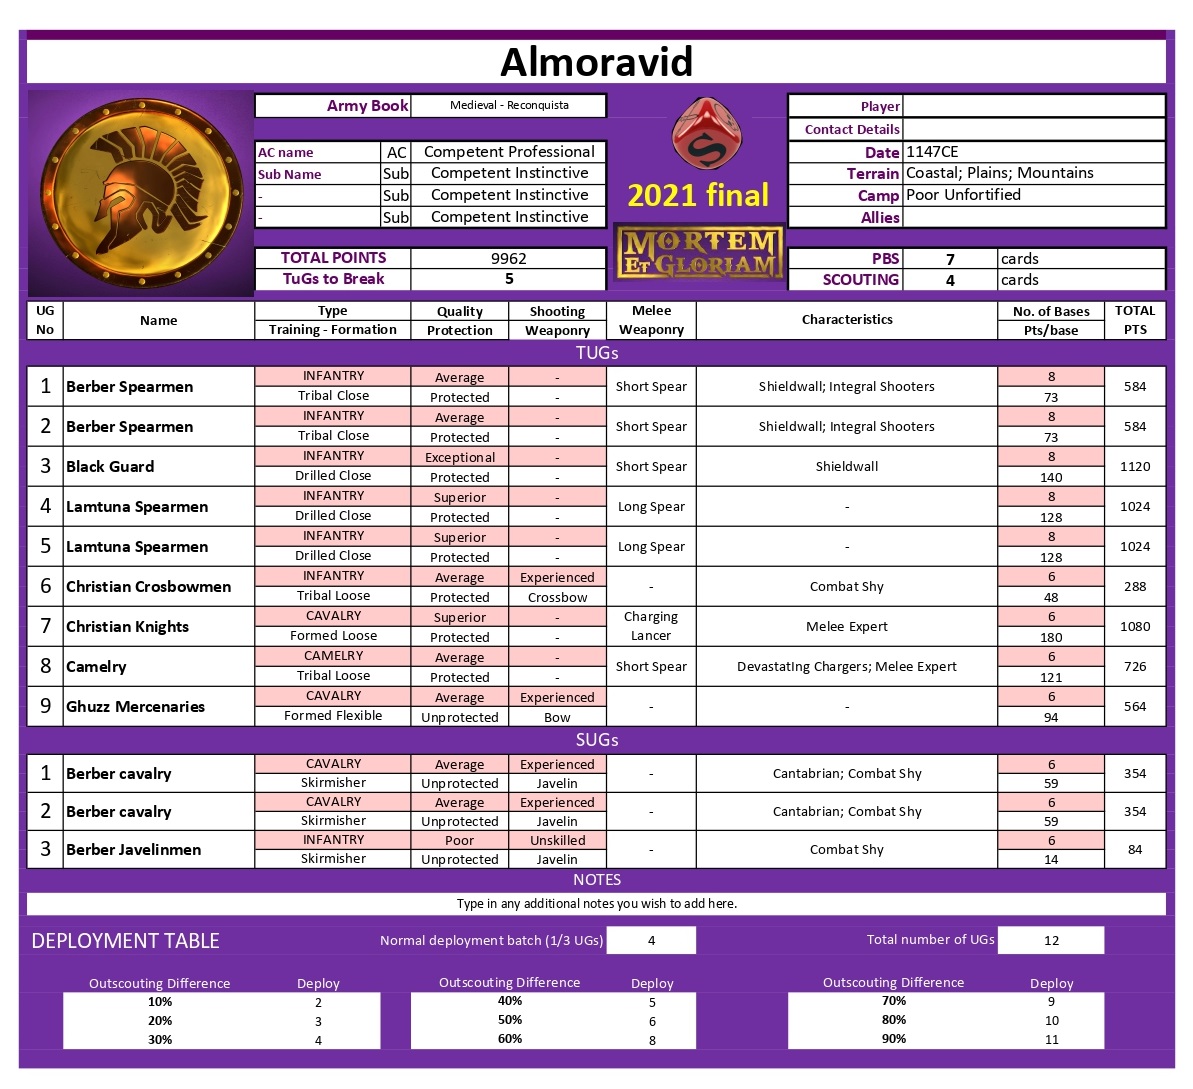
Almoravid is a good strong army and the Black Guard and Lamtuna Spearmen are very tough. Rays army has been painted by Zak from Spain and looks really nice.
Whilst I used Lusignan Cypriot:
The Lusignan Cypriot is an army I've used a couple of times before. I'd picked it out of the Frankokratia lists as it was a bit of a different take on a Crusader type army. Before I had run it with a Mamluk ally, but this time went for a version with a Hospitaller contingent instead.
The battlefield turned out mostly open as you'd expect with the armies chosen, with some rocky ground and a single wood around the edges. I declared a flank march on my right, but this was just a fake.
My deployment was infantry on my left and the mounted on my right. Ray had infantry all along his front but with his mercenary knights in the line and camels and skirmishing cavalry on his left. He also had placed an ambush marker in the wood on his right. It all looked like this:

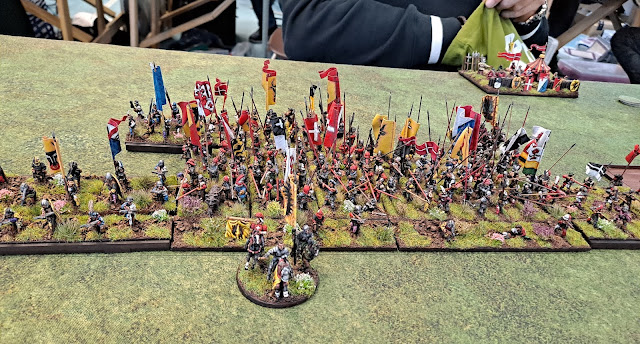
Followed by the now traditional pictures of some of the troops as deployed:


Although he was sure I didn't actually have a flank march, Ray had deployed some skirmishers just in case - they would at least prevent any double moves in that part of the table as they can only be pushed back in the first move.

The first moves saw me push forward with both wings whilst holding most of my troops back. Ray advanced along the line, some more than others, and more on his left than the right.

I had arranged the shooters on my right to pick on his camels. I was confident that the Hospitaller knights on my right could beat the Camels, but as I had the chance to weaken them a bit first why turn down the opportunity.


The following move the camels did indeed suffer a bit, losing a base to the shooting - nice when a plan works, even a minor one like this. Ray brought up his Lamtuna to support the camels and pushed his Ghuzz forward as a bit of a sacrifice to take shooting instead of the proper combat troops - I wasn't too worries about that as the Ghuzz are a TUG so if they are destroyed its a step towards breaking ray's army.
On my left I push forward with the Catalans looking to get them into a unit of Berber spearmen whilst avoiding the rather tough Black Guard who I am aiming to shoot as as much as possible with my crossbowmen before having to fight them with some of my spearmen - its more about taking them out of the game to some degree than thinking I can break them.

Elsewhere I am looking to get 2 spearmen units up against 1 of Rays in an attrition fight that I hope will go my way. A wrinkle to this is that as Ray's units have Integral Shooters I really want his to charge me rather than the other way round so that I am never down in combat.

By the end of the next move we have a lot of troops in very close proximity, but no actual combats as yet.


The following move the fighting starts. I a couple of places I hold my troops from Forced Charges in the hope that Ray won't be able to and so lose the benefit of Integral Shooters as noted above. He does have the cards to hold one unit but not everywhere. I'm happy with that.
Ray also now charges in the fearsome Black Guard who start off pretty well:

I have, however, ensure that the combat is only 2 bases wide at this point which does leave a fairly nice target for my crossbowmen (who had been kept far enough back to avoid Ray Pressing Forward into them) to shoot at which worked out well for me:

Honours equal really, but it felt like it had gone my way given the quality difference.
In other combats Ray's camels had charged into one of the Hospitaller units and come off rather second best by the end of the move:

In the rest of the infantry fighting the Black Guard only managed to inflict one more Wound in the Combat Phase despite overlaps, and in the other infantry fight Ray's unit had lost 2 bases. All in all I felt that the fighting had gone my way.

More fights were teed up for next move:

And overall the battlefield looked like this:

The following move saw Ray's camels break but my Hospitallers pursued into a Lamtuna unit - that was likely to be rather painful. My Catalans were charged by a unit of Berber Spearmen who didn't have a card to hold them but elsewhere it was mainly the continuation of existing fights, although my skirmisher horse archers were shoot to breaking by Ray's skirmishers.

My Catalans started getting the upper hand, but Ray's Black Guard continued to roll blanks - much to his frustration (and my pleasure).

The next move was all we had time for. Not surprisingly the Hospitallers who had crashed into the Lamtuna broke. Ray had charged his other Lamtuna unit into my second Hospitaller knight unit and that was a bit indecisive - I would break off from that.
Ray's mercenary knights had charged my knights and spearmen and came off rather second best there - chances are they'd break next move.

The Black Guard continued to fail to beat the very average troops they were fighting:

And my Catalans were doing the same against the infantry they were fighting:

But I did break another spearmen unit:

At the point we called it a day it was quite balanced. Ray was getting around my right but I was getting a hole in his centre and hopefully his right, but his Black Guard would have finally broken the infantry they were fighting and pursued into my crossbows.
Could have gone either way.


Good practice for the Post Covid Cup where the Almoravids beat a knight and Almulgavar heavy Early Crown of Arrogance 15:0
ReplyDelete