Seljuqs of Rum at Skullrollers 2021 - Round 5

Sunday afternoon and the 5th and final game of "Skullrollers". After 3 wins and a draw I am well placed and meet John Munro with his James IV Scots army of Flodden. Can I repeat the success of the English on that day, or fall short ...
A final reminder of my army:

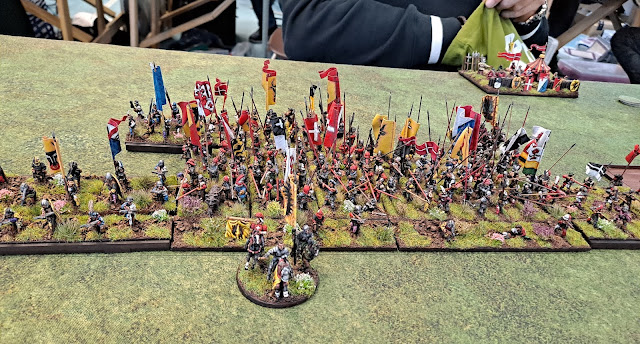
And this is John's Scots army:

This is obviously a tough opponent for me. The heavily protected front ranks of the pike formations are basically invulnerable to any but my Skilled shooters, and even they are only shooting on Black dice so really need some luck to take bases off. Ganging up on sections of the line was going to be important and being patient.
John won the PBS dice and, naturally, chose to defend in Mountains to maximise his chances of getting terrain to cover his flanks and make this as much a straight up and down fight as he could - where the advantage would lie with him. Whilst we didn't end up with too cluttered a battlefield there was enough to keep John happy and give me a bit of a problem.
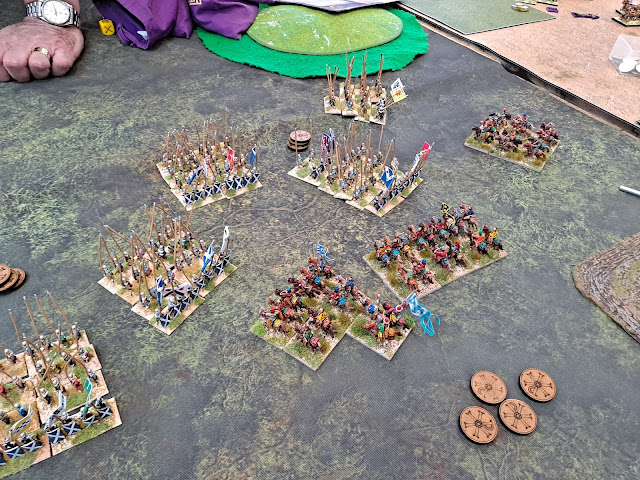
I did heavily outscout the Scots but to be honest that made little difference as it was fairly clear where his army was going to be. I did choose to send my ally on a flank march again, on my left, as there was nothing much for them to do on table and I thought they may just be able to influence the game by coming on a bit behind John's line. After deployment it looked like this:

The rather annoying patch of rough ground on the Scots right allowed John to put his longbowmen there in safety to cover what would otherwise have been a rather hanging flank. My flank marching on that side also included the thought that they might just tempt the bowmen out at which point the Christian mercenaries deployed on my left could potentially speed forward and catch them at a disadvantage.
As this is another report where there are fewer pictures, mainly because they would tend to look rather the same other than John's infantry getting closer to my baseline and so not that interesting; so here are some pictures of the troops at the start of the game.


The first move saw my luck with my ally continue with them being reliable and also pulling the right discs to some on in the first move in whatever formation they desired.

In the first move the Scots lurched forward as expected and likewise I pushed my cavalry forward to take up positions where they would soon be able to start shooting and looking for those lucky shots that took off bases (i.e. 2 wounds on black dice). I brought the flank march on straight away as there would be nothing gained from keeping them off and allowed me to put a bit, but not much, pressure on John's right flank that could possibly use a bit of his command and control.

The next move sees a bit more of the same. John played a very sensible and very controlled game throughout and was happy to make sure he always kept his formation together and kept discs back to remove wounds whenever possible. I am also starting to move up my non-Skilled shooters as even these can help as although they may not cause wounds they might cause Slows which can give me more time.

Now the shooting starts, and I crossed my fingers a lot. However, that didn't work and my shooting just caused a few Slows on the pikemen and an odd wound which, as noted above, John wisely removed each time.
The following picture is n illustration of how well John played this. He is not advancing when he does not need to and has a plan for plugging the one place where a gap could appear in his line at this point.

On my left my ally has caused a reaction from the Scots bowmen and also their Border Horse who have come up to chase off the Turkmen. Obviously the Turkmen nearest the longbows have pulled back both to avoid being shot at and to try and tempt the bowmen into the open (as mentioned above).

The wider view across the table:

For the next few moves the Scots pikemen continue their deliberate advance - not rapid as the Shield Cover is slowing them (along with some shooting effects), but I am doing nothing in the way of removing bases - it feels inexorable.
However, we do have some action on my left flank. The Border Horse charge the Turkmen, causing a base loss with their Shoot & Charge, but the Turkmen run away safely.

They charge again the following move and again fail to contact, however, this does allow the other unit of Turkmen in the area to position themselves for a flank charge (just out of range of the pikemen thankfully).

The longbowmen are starting to be tempted to come out of the rough going as you can see.
Next move the Border horse get hit in the flank by my charging unit. Rather embarrassingly despite the flank charge my unit gets broken - the Turkmen are not that tough in prolonged combat and they failed to do much damage when they hit the flank. However, after they have pursued my routers, the unit they had originally been chasing was able to move up and be able to charge their rear - of course, it could go wrong again but as the game is moving further and further from my reach why not.
At this point as well, John finally brings the longbowmen out of the terrain and my Christian mercenaries make a double move into position to be able to charge them.
Also at this point I finally get a bit of luck and take a front rank base off one of the Scots pike units.
The one furthest away from camera being shot at by the skirmisher horse archers. Although it will not change the course of the game, I then shot the pike unit to destruction in the next 3 shots which does illustrate what could have been with a bit of luck early on. But "what if's" don't win you games.
Elsewhere terrain and the table edge are looming to get my troops pinned and forced to fight.

Alas I took no further pictures, perhaps trying to avoid recording the collapse of my army ... However, I will relate it.
On my left flank I was quite successful. The Christians rode the longbowmen down without breaking sweat whilst the Turkmen got their charge right this time and broke the Border Horse. However, the game was going to end before they could do any more, and it would have taken a while for them anyway.
In my centre and on my right my horse archers and mamalik were contacted by the Scots as they ran out of room to run. The horse archers hung on a bit longer than I might have expected, but not that long. The mamalik did better, but you'd expect them to being better troops and one unit started taking bases off its opponent and started to fight the weaker rear ranks. At the same time I managed to get the Arab Cavalry into a position to charge the same pike unit in the flank. Between the two they broke the pikemen - so I now had 4 of the 6 units needed to break the Scots.
Of course, in the meantime the Scots broke the other mamalik unit and went on to sack my camp, the result of which was that my army broke.
The final score was 15-8 to John, a very deserved victory as he had played a very good game.
The win put John on the top of the heap when the final results were announced, whilst I finished jut off the podium in 4th place (on countback). Although I hadn't realised it whilst we were playing if I had won the game I would have been top.

All in all I had a great time, enjoyed all the games and did pretty well. Roll on the next competition - I think I'll be taking a break from horse archers for that though.


Comments
Post a Comment