My third game at Outremer and Reconquista was a top of the table clash between my Syrian States and Lee Sanders' Early Crown of Aragon.
Last time we met in competition I won, would the same happen this time round? Read on to find out ...
A recap of my list:
Lee's army is an interesting mix of good knights, hard charging, Fleet of Foot, but Unprotected Almughavar infantry, and some useful skirmishers. I nice combination if you can get the parts working together.I invaded and aimed for minimal terrain, whilst Lee tried to get some terrain for his Almughavars to use, and also to restrict my mass of cavalry. We ended up with a single Wood centre-right in Lee's half of the table but otherwise nice and open. I was certainly happy with that.
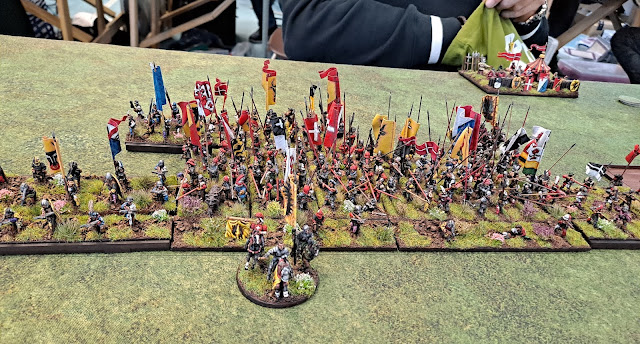
I outscouting Lee which meant I was deploying second in the sequence which again was useful. Lee deployed compactly around the Wood with his knights behind infantry and skirmishers to be able to deploy where needed. He also placed an ambush marker in the Wood which I guess (correctly) was a unit of Almughavars. I deployed heavily to my right aiming to use the nice open space on that flank. It looked like this:
My allies again proved reliable and so I had no issues there.
First move sees me push hard on my right whilst Lee advances a bit more cautiously and begins to move his knights from the rear towards where they will be needed. I also push shooters towards the Wood where Lee has moved his ambushing unit straight away - as one of my units is Skilled shooters if it can shoot at the Almughavars it will still shoot on Green dice even if they are in cover as they are Unprotected 😎
Things look like this at the end of the move:
The second move sees me line up to charge the Almughavars and Crossbowmen Lee has in the open next to (and partly in) the Wood. I want to strike these with the Armenian cavalry and Franks as soon as possible so that Lee hasn't got his knights up into the action. I think I can break 2 units fairly quickly, although it is likely that the Armenian cavalry will then suffer by pursuing into a knight unit that is better than they are 😔 But I'm not going to win this one without losses along the way.
Elsewhere I shoot a couple of bases off and put pressure on the Jinetes on Lee's left.
Next move is quite a good one. The Armenian cavalry ride over the Crossbowmen in short order, but as expected pursue into Lee's best knights. The Franks do less well against the Almughavars, but break off ready to charge in again next move.
I laos get some good shooting in the turn destroying a Jinete unit and badly mauling the Almughavars in the Wood - Green dice as mentioned above. Of course Lee has now created a mass of knights on his right so pressure will be coming my way shortly. But I'm still quite happy; Lee is definitely feeling under the cosh a bit at this point.
The next move is pretty good for me as well. The Franks thunder through the Almughavars on their second charge, although their pursuit takes them into the Wood which means they'll be out of the game for a while.
The previously ambushing Almughavars charge the Turkmen in front of them and, due to a 1 rolled on the evade cie, they catch them. Not good. However, the Turkmen are lucky and only suffer 2 base losses and reduce the Almughavars to 4 bases (half) and break off. I can live with that. Also the Armenian cavalry are still in the game, albeit losing, but it means Lee's nest knights are tied up.
Of course the pressure on my right is increasing, but I feel I have it in hand. I do, however, have to leave one Turkmen unit hung out to dry - but again, acceptable losses.
As expected the badly shot up Almughavars are destroyed next move, but my left is now under quite a bit of pressure - the Turkmen will not last long in front of a Crossbowmen unit 😔 Additionally, the Armenian cavalry succumb to the inevitable.
On the right my shooting dries up - well, it had been good so far so it was likely to even up. Also my Syrian cavalry have been run over. This means that on that flank things are starting to move Lee's way as he pushes the advantages he has there. The game is in the balance now.
Things are now coming to a head, there will only be a couple more moves.
My Turkmen on the left somehow survive being shot at - Lee rolled some really rubbish shooting dice, nothing to do with anything on my part. However, my mamalik start to chew their way through another Almughavar unit - helped by Lee really having to charge me meaning I rolled Green dice for shooting at him when he charged and then Green dice in the Charge and Melee combats; that can rack up quite a bit of damage.
Not so good on my right though. With the Syrian cavalry destroyed Lee has knights bearing down on my Bedouin. I can, however, get a charge into their rear with a Turkmen unit which could possible recover the situation as Lee's knights are just a 4 base unit.
Alas, the rear charge is a damp squib and the Turkmen get battered when knights turn on them - they are down to 3 bases and a second knight unit is placed to charge them in the rear next time 😟
Better news on the left. Although the Turkmen are finally (and rightly) shot down my mamalik destroy the ALmughavars and pursue into the crossbowmen - they have a reasonable change of destroying them fairly quickly. It has become a race to get the last unit to break the opponent 😁
Next move is the final one and importantly Lee is the Active Player. Basically this means that as he chooses the order of combats he gets to break units on my right before my mamalik can break the crossbowmen they are fighting. My army is broken.
I lose the game 9-15, however, it has been a really great game with swings both ways. Lee played a good game and wasn't put off when I got off to a bit of a flier. He went into the last round deservedly in first place 😎
The fourth, and last game is HERE


Comments
Post a Comment