Roll Call - Lusignan Cypriots part 2

12th and 13th of April 2025 saw the annual Roll Call competition run by the BHGS. A small MeG field of 6 players, but much fun was had in the games.
I took Lusignan Cypriot and after the first 2 games was on 25 points and in the lead. To see how things went on day 2, read on ...
The theme for Roll Call was Ottoman (ish) based on the Ottoman Turkish list, the enemies listed for them and a few others added to give players a good choice. Armies had to be dated between 1362 and 1520 CE. All the lists can be seen HERE.
I chose to use Lusignan Cypriot with a Mamluk Egyptian ally and came up with the following list:

I defended and decided that if I could get quite a bit of terrain on table it might break up the polish knights enough for me to create opportunities. As it happened we ended up with a lot of terrain. We had a scattering of Rough terrain on the left and in the centre, and a large Difficult hill in the centre right of my side of the table. There was also a gentle hill on my right.
I was, of course, outscouted and deployed most of my cavalry on the right (hoping to use the hill to even things out in fighting), but positioned one knight unit of the right. Infantry made up the centre with the spearmen in the open ground and the rest in, or poised to go into Rough terrain. The poles were deployed with Battle Wagons at the rear, crossbowmen placed to occupy terrain and knights mostly on my right but a unit in the centre and one on my left. So as I had hoped the congested table had split the Polish knights up a bit.
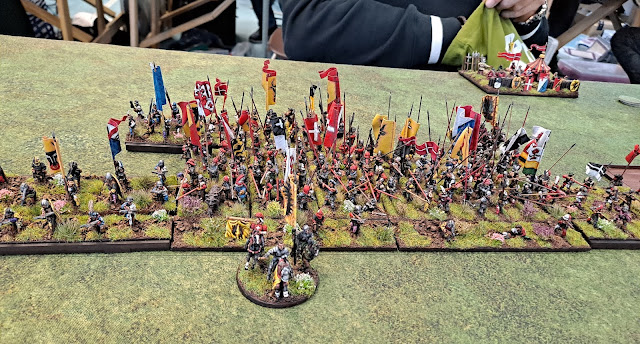
After we had deployed it looked like this:

The first couple of moves saw the armies advance towards each other, a bit cautiously in places. My cavalry occupied the hill on the right whilst the Polish cavalry advanced up close. In the centre I pushed the spearmen forward to contain the Polish cavalry there which allowed me to move some crossbowmen onto the flank of the Polish crossbowmen who were supporting their left flank cavalry. On my left my other unit of knights moved to take on the Polish cavalry - I didn't expect to win here, but if I could tie down the Polish cavalry I could get my Catalans into the crossbowmen on that flank.

On my right Stephen did not charge in immediately and waited a while to see if his shooting could wear me down at all so as to make the combat better when it happened - a fair choice IMO. However, his shooting was terrible and after a couple of turns he charged. His poor dice continued into the combats and my single knight unit was dishing out more than it was taking. The Mamluks skirmished and did some, but not a lot of damage.
As they had the flank my crossbowmen from my centre charged the Polish crossbowmen in the flank, but didn't do much damage.
On the left this style of combat was replicated. My knights charged the Poles and for no loss knocked 2 bases off the Polish knights. With the Polish knights tied up my Catalans charged the crossbowmen, but initially did very little. In the centre after a bit of dithering the Poles charged a spear unit, but Stephen's poor combat dice continued there.

Eventually on the right the Polish knights remembered how to fight and broke my knight unit, however, I had contacted the other Polish knight unit from 2 sides and reduced it to near broken. I had made a blunder here as I stood with a Mamluk unit instead of skirmishing which meant that the unit hitting it from the side failed to be a flank/rear charge as Stephen angled his charge so it didn't qualify - if I had skirmished I would have hit them in the rear despite the angle.
After failing to do much damage with their flank attack my crossbowmen then ripped into the Polish crossbowmen, and on the other flank the Catalans did the same, although these did take damage along the way. My knights on the left continued to whittle away the Polish knights whilst still taking no damage themselves.

Time was called shortly after this, however, before that happened I broke the 4 units I was fighting and so the score was 10-4 to me.
The idea of using terrain to break up the Poles had paid off, however, I was aided by some poor combat dice from Stephen.
The final game matched me against Gareth Evans who was using a Medieval German army. Again I lost the initial dice roll and was outscouted. Terrain ended up mostly tot he flanks with Rough on my left and a Difficult hill on the right in Gareth's side of the table; there was also a piece of Rough on my table edge centre right.
I placed a crossbow unit in the rough on my table edge with a knight unit and the small Mamluk unit to the right. My centre was the other Mamluks and the other knights with spearmen to their left filling the table to the terrain on the left where my other crossbowmen and the Catalans were. Gareth massed all his cavalry on my right with a mixture of Battle Wagons, artillery and infantry extending right from there.

My plan was to draw out the German cavalry, hopefully being able to get the Mamluk Skilled shooting on them as they were all Average, whilst also attacking on the left where I had better infantry thanks to the Catalans. To some degree I ignored the Battle Wagons, treating them as terrain that could shoot a bit 😆 However, there was a Combat Shy crossbow unit in amongst the wagons which looked like a good target for some cavalry.
Cards were not great for either side at the start and other than my left which could double move advances were a bit limited.

Again, apart from my infantry on the left rushing forward a double move, the following move was a bit more of the same. However, I was able to tee up a knight unit to charge the crossbowmen in the centre of the German line and the Mamluks formed up to threaten the German knights.

The knights did the business on the crossbowmen, however, Gareth had cleverly wheeled a unit of wagons so that the pursuing knights crashed into them rather than pursue into a second crossbow unit. I had not seen that coming at all, so credit to him - however, I was quite happy to exchange units as his army breaks on a lower number of losses than mine.
Elsewhere the German knights are starting to become a bit disjointed due to the threats I can pose and on my left my infantry continue pushing forward. One German knight unit tries to catch some Mamluks but just ends up with enemy to the front and to the flank - the mamluks who get on their flank do so because the only German troops near them are Wagons who, other than a bit of shooting, can not really do much.

In a flurry of activity on my right the small Mamluk unit fails to get away from a German knight unit which catches it in the rear and destroys it. However, this means the knight unit I have on that flank can double move to be able to charge the Germans in the rear next turn so I'm OK with this.
The German knights facing the Royal mamluks charge but are blown away by shooting. However, as I did charge them with the unit that was on their flank, this unit pursues and ends up with a German knight unit to its rear - it will have to roll a good run away move to escape from this ... The other Mamluk unit that shot down the other Germans had stood and shot and so could move and so moves to be able to charge the second German crossbow unit which has moved up.
On the left my Catalans have charged the German spearmen and as both sides have expanded as much as possible there is a long line of fighting but I am up in these combats so that is nice.

Next move is the last as all the combats go my way and I break the German knights, crossbowmen and spearmen which with the units I have already broken takes the army down. 15-2 to me.
This left me on top of the pile and so got the 1st place trophy

Final results were:


Comments
Post a Comment