Early Northern Song at Ice & Fire - Part 2

Following on from a satisfying victory over the Khwarasmians in the first game, the Song moved onto to face Early Fatimids in the second game. Read on for details ...
My opponent was Paul Cummins who I had, by coincidence, faced in the second game at Warfare at the end of 2021 (you can read about that game here). Early Fatimid is an army I have used on occasion and it was interesting to see Paul's take on it, and I must say I liked his list (you can find it with all the other Ice & Fire lists here).
In a spooky rerun of the PBS of the first game Paul won the PBS dice roll with a Skull which allowed his a Strategic Intercept if he desired. Like Dave he chose to invade, however, as defender I again won the first card and so could choose the territory type and I chose Standard. We ended up with a Mountains/Forest secure flank, a forest on my right, a wood roughly centre-left table (from my view) and a couple of vineyards on my right one in each half of the table.
Paul then drew four Yellow discs for his scouting only to be matched by an outrageous two Red discs from me.

So neither side was outscouted meaning that as defender I deployed part of my army first. Neither of us bothered with Flank Marches or Ambushes.
After deployment the armies squared off like this:
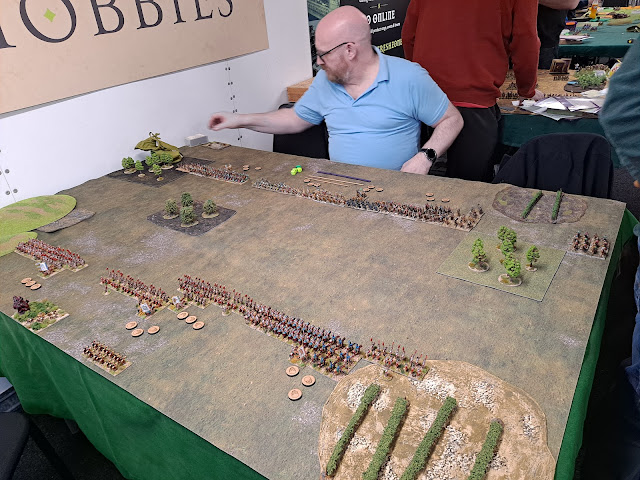
Paul deployed with a fairly strong cavalry wing on his right (Long Spear cavalry and two units of ghilman, the latter four bases strong) with his Dailami lined up to push through the small wood. His heavy infantry extended to his left which was held by a unit of Long Spear cavalry supported by Turkmen Skilled shooters and skirmishing Berber cavalry.
My left was set up to hold with a couple of the cavalry units that could skirmish supported by a unit of Vanguard Swordsmen who would also aim to contain the Dailami. After that my deployment somewhat mirrored Paul's (or he mirrored mine as I was setting up before him) with my right held by one of the crossbow armed units.
In many ways the armies were quite similar, however, my crossbows infantry gave me the ability to cause damage at range and so would, hopefully, mean Paul may have to push where he would rather not to avoid just being shot where he stood.
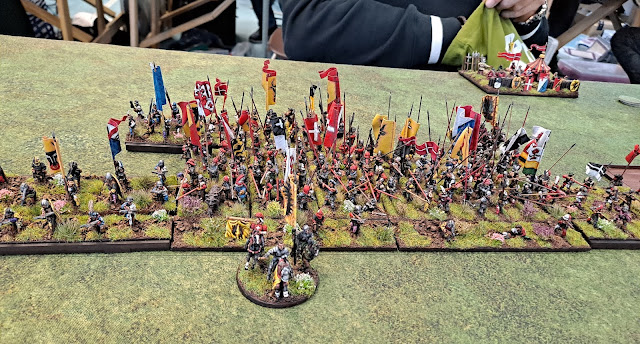
A few snaps of the armies:


Move one saw Paul push forward his infantry centre and the cavalry on his left wing, whilst pulling back the skirmishers on his left wing when I moved my skirmisher horse archers up to block him coming round the forest on that flank. He also pulled back his entire right wing of cavalry - no doubt as bait hoping that I would advance and over commit my left win cavalry which he could then turn on and destroy.
My infantry centre and right wing advanced towards his troops. I was hoping that the crossbow unit on the right of my line would be able to shoot up Paul's Turkmen who were Unprotected, but he was resolutely keeping them in Skirmisher formation making that less likely - he has been burned by that one before.
The end of the move looked like:

Some closer shots whilst there are pictures available; this was another game where as we moved to the later turns I forgot to take picture - damn the absorbing nature of the games:


Next move I pushed the cavalry on my left up as far as I felt comfortable - more or less to the end of the wood. As expected Paul then reversed some of his cavalry to face them, but not all just to see if I could still be tempted no doubt. One unit of his ghilman went to support his main infantry line and his Dailami entered the wood.
In the main infantry arena Paul advanced a little and I pushed my infantry up to shooting range - well I can shoot and he cannot so why not? The rest of our troops more or less conformed, but I did push a cavalry unit forward to cut down Paul's options a bit.


Following move was a bit cagey. My crossbowmen had some success against Paul's infantry and slowed him down as well as taking off an odd base. He advanced a little and my infantry fell back maintaining the gap for shooting much as planned.
On my left Paul realising that my cavalry had come as far forward as they were going to advanced his troops and mine fell back. His Dailami also advanced.


The next move I have a bit of a rush of blood and charge my Guard Cavalry - possibly influenced by their sterling performance in the first game. This is a bit foolish really as whilst I am aiming at his weaker Long Spear cavalry they actually mainly hit Paul's Long Spear infantry who have Intercepted. The guard are good, but not that good and lose 2 bases in the move. My mistake is compounded by the fact I had not made sure they had a disc for a Break Off move.
Elsewhere my crossbowmen have got their eye in and shoot off another couple of bases. However, I am not able to pull back with most of my infantry this turn and so Paul is able to get in my face with his troops.
On my left my cavalry again fall back as Paul's advance. The Dailami also advance but here Paul make his own mistake and pushed them a bit far. As you can (just about) see from this picture his advance has left my left hand file behind his front and so able to Flank Charge him next move. This will prove costly.

With a big crunch imminent the battlefield looks like this:

Of course, this is where I fail to take pictures ...
Rather inevitably my Guard Cavalry break, although the resulting KaB tests don't do too much harm.
The main infantry clash is quite short and bloody, well we do have quite a bit of Green dice vs. Green dice here so that is to be expected. I lose my right hand unit which does create rather hole on my right, however, the centre unit of my line holds steady - in fact more than that it dishes out rather a lot of damage.
On the left the Dailami suffer quite badly from the flank attack - on a red and Green dice I roll a Skull with both, but it does not quite break and in fact fights back quite effectively. With Paul pushing back my cavalry on this wing he is setting up his unit of ghilman on his right to swing in and charge the flank of my unit.
I must confess that at this point that despite a reasonable amount of success I was wondering if it was all going to unravel. I had lost two units to Paul's one and the gaps were looking worrying.
The next move was decisive.
My infantry broke two badly damaged units of Paul's infantry and a charge by a unit of his ghilman was heavily damaged by shooting and then broke due to a KaB test. This unit breaking caused a KaB on the Dailami who had been fighting back like demons and had the upper hand against my Vanguard Swordsmen, and a lucky roll saw the Dailami break as well.
Suddenly I was one unit from breaking Paul's army.

With the writing on the wall, next move Paul tried a bit of a desperation charge with a damaged unit of Long Spear cavalry on my right into a crossbow unit. However, this failed and when it broke the game was over.
15-4 to me which was a bit flattering in a game that could have gone either way.
Left me on 30 points from a possible 30 at the end of the first day - can't get better than that.
Game 3 is HERE.


Comments
Post a Comment