ToILing Away With Uqaylids - Game 1 vs Normans

I took a Bedouin Dynasties army, Uqaylids of Mosul. To see how the first game went, please read on ...
The Bedouin army is one I first used back in the DBM days and was reasonably successful with it. After taking up MeG I have returned to it from time to time. I used it at the 2022 iteration of ToIL and did quite well, but due to circumstances had to leave early and so only played 3 games instead of 4. So it only seemed reasonable to use it again for 2023 and hope to play all 4 games this time.
Initially I was going to use the Hamdanids of Aleppo version that I had presented in the MeG podcast on Nikeforian Byzantines (listen to the podcast HERE, or read the list it HERE), however, after a practice game I decided that the "catafract" Ghilman did not really work and so decided to use a version with 2 units of standard Ghilman. I also found a way of getting a unit of Kurdish charging cavalry into the list by a few changes. This added a bit more punch and I think balanced the army better. I also reverted to Uqaylids as I wanted the option of Plains as a territory type instead of Mountains (all the dynasties have Standard and Coastal as territory to which Hamdanids in Aleppo add Mountains, others Plains).
The list I used was:

I think this is quite nicely balanced, however, it is also a bit of a "bits and pieces" army that isn't string in any one area and needs to get somewhat disparate troops to work together. Whilst it will usually want a fairly open battlefield it likes a few bits of terrain if facing a "heavy punch" army such as the Normans who were popular at the competition.
The first round draw put me up against Keith Spedding who was using Normans. Keith has suffered against my horse archer armies when we have met previously, most recently at Britcon 2022, and I'm sure was happy that my army could not have many horse archers. I was, of course, nervous about the number of good charging cavalry the Normans would field (3 Superior and 3 Average as it transpired).
Keith had a Legendary C-in-C and invaded with a Strategic Intercept. However, we drew the territory selection and so I still got to choose the territory type - I had played a high colour to try and get the choice and it worked. I chose Standard terrain and we ended up with a Secure Flank with steep hills and just one other piece of terrain, a Forest roughly in the centre of the battlefield. I was reasonably happy with this; there was enough open space for my cavalry to manoeuvre, but the Forest broke things up a bit giving me some opportunities as Keith had only skirmisher infantry that could operate properly in terrain. I outscouted the Normans by 60% so got a good idea of where they were going before I had to put any troops down.
The Normans deployed with a couple of "filler" infantry lurking at the back, 2 Average cavalry on their right, a centre of crossbowmen and skirmishing infantry opposite the Forest and their left were the remaining 4 cavalry units, 3 of which were Superior.
I placed my skirmishing infantry and a unit of Bedouin on the hill on my left to threaten the Normans opposite. I wasn't expecting the Bedouins to actually do anything but be a distraction, but in Skirmish formation they still move reasonably well even on steep hills. A small Bedouin unit and one unit of the Armoured Cavalry formed the rest of my left. My centre was, unsurprisingly, the Dailami set up to go through the Forest, and the other Armoured Cavalry unit behind them able to deploy where I needed them. My right was the 2 units of Ghilman with the Kurds a bit to their left and rear, and a unit of Bedouin on my far right. The "junk" Bedouin unit was on the baseline trying to keep well away from any action.
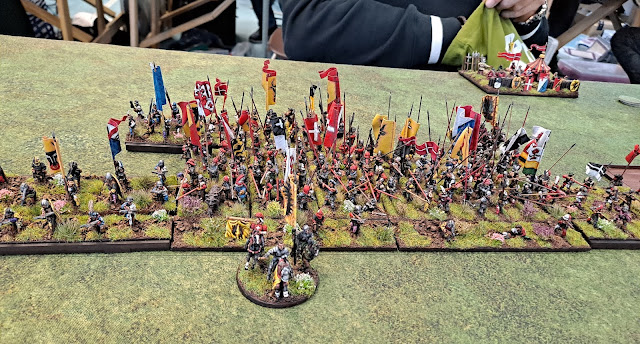
So it looked like this:

First move didn't see any dramatic advances as neither of us had great discs. A bit of an advance on my left, Dailami into the Forest and a push forward on my right with the Ghilman. Keith's left advanced a bit but was limited with only the Average unit on his extreme right double moving.

The following move developed along similar lines. I pushed a bit om my left to see if I could tempt Keith into being rash - no luck there 😉 In the centre my second Dailami moved into the Forest to support the Armoured cavalry next to them to contain the Superior Normans heading that way. Keith's right advanced to get up close to one of my Ghilman units, however, with a sneaky Turn 90 and move they repositioned themselves such that if they were charged they could Run Away forwards to get behind the Normans. Only my far left the Average Normans moved to threaten the Bedouin, but these danced out of direct trouble.


A very satisfying 15-2 to me. However, whilst I feel that I played a good game, I also think that Keith had some pretty poor combat luck with his Superior Norman cavalry units - all 3 were destroyed for the loss of just 1 Dailami unit. ven in a losing game he could expect better than that.
An account of my second game is HERE.
Pictures of the armies at deployment.


Comments
Post a Comment