Following my success against the Normans the second game of the weekend saw my Uqaylids drawn up against Matt Haywood's very pretty Thematic Byzantine army.
To see if I could repeat my first game success read on ...
The Thematic Byzantine list doesn't seem to get the love that the earlier and later Byzantine lists get, and so it was great to see one being used. As Matt and I have discussed this list before, especially since the podcast on the Nikeforian Byzantines (listen to the podcast HERE, or read the list it HERE), I knew he had an effective list. It wasn't actually his preferred version, but the competition rules on what allies could be used meant that he couldn't use that.
As a reminder to readers, here is my Uqaylid list:
Matt had a legendary general and so won the PBS dice off and invaded. I did get to choose the territory type, Standard, however, we ended up on a completely open battlefield. I would have liked some Rough terrain to play with, however, I was not that bothered as I knew my army was going to be larger and so manoeuvre would be important (again). I did win the scouting though and so would be putting my troops down second - it was 30% I think, but enough to be valuable.
Matt deployed a Fortified Camp in the middle of his base line (a sensible army list choice in my view for his army), and his army to his right of that. basically good troops up front, weaker troops supporting including a unit of 2nd Class Thematic cavalry hoping to avoid any sort of fighting - they were Poor and Combat Shy ...
Seeing how Matt was deploying I put most of my army on my right with the intention of putting pressure on his left flank and hoping to somewhat pull his army in more than one direction and exploit any dislocation. This also allowed me to keep the Dailami away from a direct charge by Matt's good Lancer cavalry to which they were a bit vulnerable.
So after deployment things looked like this:
The first move saw the weight of the Byzantine army wheel towards my right flank whilst the Byzantine right pushed at my weaker left wing. Troops from the supporting line (blimey, proper Byzantine tactics as per the manuals ... !!) moved to cover the gap that was opening up in the front line. I pushed on both wings although some of my left wing troops held back somewhat. I'd have liked to push a bit further on the right, however, cards dictated that it wasn't to be.
The action continued to develop this way in the subsequent moves. I think at this point Matt had a decision to make about his last reasonable unit in his second line - whether to send it to his left to face my larger wing or right at my weaker wing where there was also a bit of a gap between my troops. He chose the latter. I think there were good arguments for both and his choice was the more aggressive one so probably the right one. Reinforce where you expect/hope to have success.
We shortly got some fighting underway. The Byzantines had a unit of Georgian cavalry which were basically the same as my Kurds (i.e. Charging Lancers) and they went in against one of my Armoured Cavalry units. This combat turned out to be "handbags at dawn" and continued to the end of the game with the only losses being 1 base of the Georgians 😂
On my right I pushed my Kurds to fight one of Matt's best units in order to tie that up whilst I moved my Dailmai around their flank. At the same time Matt pushed strongly at my Ghilman with good cavalry forcing them to fall back at speed - sadly for me the Ghilman shooting was ineffective so the Byzantine cavalry remained very dangerous.
One good thing resulted from my pushing hard on my right was that Matt was forced to bring up his "reserve of last resort", the 2nd Class Thematic cavalry. My Bedouin cavalry fancied their chances against these and so I flexed them to Loose formation.
Things now continued apace.
As you can see Matt's cavalry is really pushing my Ghiman back and the table edge is looming, my camp is also looking rather vulnerable - in fact at this stage I am resigned to losing it as there is nothing left to protect it.
On my left my second Armoured Cavalry unit is successfully taking on a Byzantine cavalry unit and a Bedouin unit that has been lurking around since the start gets a flank attack on a 4 base Koursores unit damaging it badly.
My right also sees significant action. Dailami get into the flank of the Byzantine cavalry and the Kurds continue to out-perform and the Byzantines are now nearly broken. Matt nearly had a flank attack on one of my bedouin units with his 2nd Class Thematics, however, a Countercharge by the other Bedouin unit placed them so that the contact did not actually count as a Flank Charge. I was probably a tad lucky with how that worked out to be honest and I think Matt was a bit surprised as well. As hoped the Bedouin started to knock chunks out of the Byzantines here.
The following move turned out to be the last as we ran out of time to get a full result.
My camp fell to the inevitable cavalry charge, and although there were no more units of mine that could break due to the resulting KaB tests.
After disposing of the Koursores my Bedouin on the left pursued into the flank of the cavalry fighting my Armoured Cavalry and broke them. However, the Armoured Cavalry broke as well (may have been the camp KaB test that did for them - although there were no more units of mine that could break due to the resulting KaB test).
The Byzantine cavalry fighting my Kurds and Dailami broke as did the 2nd Class Thematic cavalry.
If we had had 1 more turn I might have broken Matt's army as I had another flank charge lined up from my pursuing Bedouin from the right, however, that would have depended on a number of dice rolls so wasn't a certainty.
The end result was 10-7 to me.
An account of my third game is HERE.
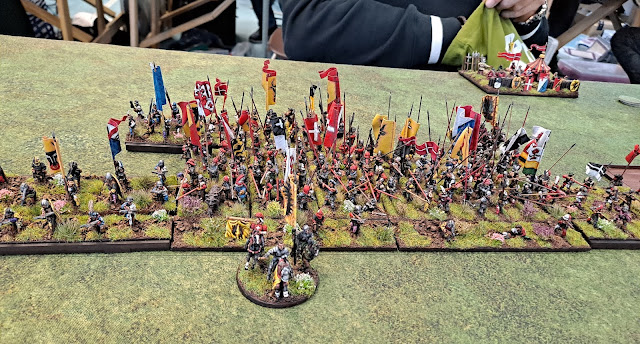
Pictures of the armies at deployment - they don't do Matt's army justice.


Comments
Post a Comment